Path of Exile 3.28: Exploring All Newly Added Skill and Support Gems

Path of Exile 3.28: Exploring All Newly Added Skill and Support Gems

The 3.28 “Mirage” league delivers a major shake-up to the game’s gem system, introducing a wide range of new skill and support gems that push build creativity further than ever. Rather than simply increasing damage numbers, this update focuses on adding new mechanics, interactions, and playstyle options that significantly expand how characters are built and played.

Fresh Skill Gems in 3.28

This patch introduces both entirely new abilities and additional Transfigured Skill Gems, giving players more ways to customize their builds. Many of the new additions lean into divine and elemental themes, offering strong visual identity alongside unique mechanics.Don’t let a currency shortage hold you back—get your POE currency at MMOexp now and thrive!

Holy-Themed Skills

A key highlight of the update is a set of holy-based abilities designed around melee combat, area damage, and defensive synergy.

Some notable additions include:

Divine Blast (Str/Int): Fires a beam of radiant energy that explodes outward, making it effective for clearing groups of enemies.

Holy Hammers (Str/Int): Slams the ground to summon repeated hammer strikes from above, scaling with Power Charges for extended impact.

Holy Strike (Str/Int): Generates spectral allies on hit that assist in combat, adding sustained offensive pressure.

Shield of Light (Str/Int): Converts blocked hits into cone-shaped bursts of damage, blending defense with offense.

These skills are especially well-suited for melee-focused characters, hybrid builds, and players who enjoy combining survivability with consistent damage output.

New Transfigured Skill Variants

Transfigured gems return with even more variety in 3.28, offering alternate versions of familiar skills that dramatically change how they behave.

Examples include:

Shockwave Totem of Authority: Deploys a totem that emits repeated seismic pulses.

Static Strike of Gathering Lightning: Stores energy that releases chained lightning effects during attacks.

Charged Dash of Projection: Creates a controllable path that deals damage along its route.

Flamethrower Trap of Stability: Triggers traps that release sustained streams of fire.

Kinetic Fusillade of Detonation: Spawns delayed projectiles that explode for burst damage.

Orb of Storms of Squalls: Summons mobile storm orbs that reposition while attacking.

Shock Nova of Procession: Expands multiple lightning rings for layered area damage.

Storm Burst of Repulsion: Channels energy that detonates upon release.

Siphoning Trap of Pain: Applies chilling beams that deal damage over time.

These variations encourage experimentation, especially when paired with gear that enhances elemental damage, traps, or totem mechanics.

Exceptional Support Gems

One of the biggest innovations in Mirage is the introduction of Exceptional Support Gems. Unlike traditional supports that mainly increase stats, these gems alter how skills behave or introduce entirely new mechanics.

Some examples include:

Greater Multistrike Support: Enhances repeated melee attacks with improved targeting.

Hextoad Support: Changes how curse-based skills interact with enemies.

Bloodsoaked Banner Support: Improves banner effects, particularly in group scenarios.

Eclipse Support: Adds new interactions across multiple skill types.

Hiveborn Support: Expands the potential of offering-based strategies.

With more than 40 of these supports available, players can rethink existing builds or develop entirely new ones from the ground up.

Build Impact and Meta Shifts

The combination of new skills and advanced support options makes 3.28 one of the most flexible updates for build diversity.

Melee and Hybrid Builds: Holy-themed and lightning-based skills offer strong versatility for both clearing and bossing.

Trap and Totem Playstyles: New transfigured options provide fresh approaches for indirect damage builds.

Advanced Synergies: Exceptional supports unlock interactions that were previously unavailable, allowing niche builds to become viable.

At the same time, these changes increase the importance of high-quality gear and crafting resources, as players look to fully optimize these new mechanics.Unlock infinite possibilities by harnessing the power of buy Path of exile currency from MMOexp!

Patch 3.28 stands out as a major evolution in how skills and supports function. By focusing on mechanics rather than raw numbers, Mirage creates a more dynamic and customizable experience. Whether you’re refining a proven build or experimenting with something entirely new, the expanded gem system offers plenty of room to explore and innovate.

How to Hit Better Online in MLB The Show 26

How to Hit Better Online in MLB The Show 26

For many players, online hitting in MLB The Show 26 is where the game really gets tough. CPU pitchers follow patterns you can learn, but real opponents constantly adjust, mix speeds, and exploit your habits. To stay competitive, you need more than quick reactions—you need a smart, adaptable approach at the plate.

Whether you’re grinding Diamond Dynasty or playing head-to-head, building a consistent hitting strategy can make a huge difference in your results.

1.Build a Strong Foundation

    Before anything else, you need to feel comfortable with the game hitting system. Timing is everything—being slightly off can turn a perfect pitch into an easy out. The more you practice against different pitch speeds, the more natural your swing timing will become.

    You should also stick with a hitting style that suits you. Zone hitting gives you the most control but requires precision, while directional hitting is simpler and more forgiving. Consistency matters more than complexity, so choose what feels right and commit to it.

    2.Recognize Pitches Earlier

      Great hitters don’t just react—they read the pitch almost immediately. Each pitch type has its own speed and movement, and learning to identify them quickly gives you a major edge.

      Focus on the pitcher release point and the ball’s initial path. With enough reps, you’ll start recognizing whether it’s a fastball, breaking ball, or off-speed pitch within a split second. That extra time helps you decide whether to swing and how to time it.

      3.Focus on Solid Contact

        Putting the bat on the ball isn’t enough—you want quality contact. Good timing combined with accurate PCI placement leads to harder hits and better outcomes.

        It’s also important to vary your swings. Use contact swings when you’re protecting the plate and power swings when you’re ahead in the count. Mixing your approach keeps your opponent from predicting your tendencies and makes your offense more dangerous.

        4.Adjust as the Game Evolves

          Online matches are all about adaptation. Most players fall into habits, especially when pitching. Pay attention to patterns—like repeated fastballs inside or off-speed pitches in certain counts.

          Once you notice a trend, take advantage of it. Sitting on a specific pitch in the right moment can lead to big hits. At the same time, don’t become predictable yourself—changing your approach each at-bat keeps your opponent guessing.Skip the grind and play your way—MMOexp makes it easy to secure MLB The Show 26 Stubs quickly and safely.

          5.Set Yourself Up for Success

            Your settings can have a real impact on performance. A clear camera angle, like Strike Zone, can help you track pitches earlier and improve your reaction time.

            Practice modes are just as important. Spending time working on timing and pitch recognition without pressure can sharpen your skills and help you perform better when it counts.

            Success at the plate in MLB The Show 26 comes down to a mix of mechanics, awareness, and adaptability. Once you get comfortable reading pitches and adjusting your timing, you’ll notice the game slowing down—and that’s when hitting online starts to feel much more manageable.Take your cheap MLB 26 Stubs Dynasty to the next level with MMOexp—where speed, value, and reliability meet.

            FC 26 Post-Patch Guide: The WZO 4411 Meta

            FC 26 Post-Patch Guide: The WZO 4411 Meta

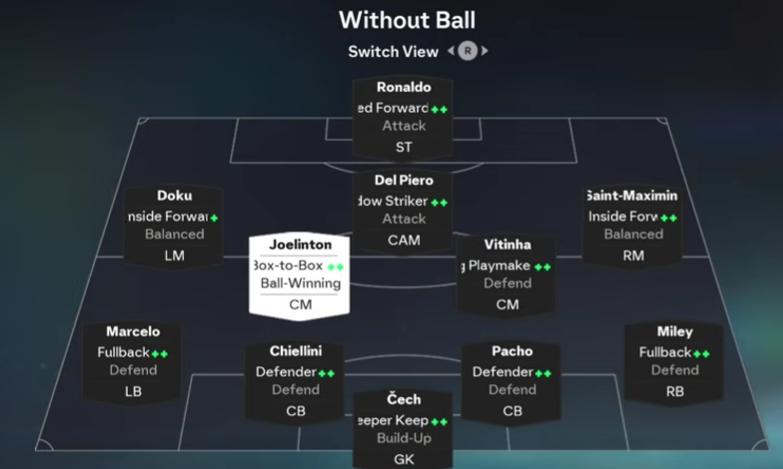
            The latest patch has shifted the meta. If you’ve been struggling to break down defenses or feeling exposed in midfield, the tactics we used last month are no longer optimal. This guide is based on the tactics used by WZO, a pro player from the Middle East, which focus on a direct, front-footed approach. These tactics are designed to maximize manual runs and exploit space immediately. If you’re looking to build a squad that fits this system, you may want to buy FUT 26 Coins to acquire the right players without the grind. We’ll cover the base 4-4-1-1 setup, the secondary 4-5-1 formation, and the crucial micro-adjustments you need to make during a match to secure those extra wins in Champions.

            Part 1: The Primary Formation (4-4-1-1)

            This is your starting formation. It is designed to be direct and aggressive, using the Counter style to hit opponents before they can set their defense.

            Defensive Line & Goalkeeper

            · LB: Fullback (Defend) or Balanced

            · Note: Start with Defend for solidity. If you are chasing a goal, switch to Balanced to provide width in attack. Switch back to Defend if you need to hold a lead.

            · RB: Fullback (Defend) or Balanced

            · Same principle as above.

            · LCB: Center Back (Defend)

            · RCB: Center Back (Defend)

            · GK: Sweeper Keeper (Build Up Defend)

            Midfield (The Key Change)

            This is where the tactics differ significantly from the standard “box-to-box” meta. To avoid exposing your defense during transitions:

            · LCM: Box-to-Box

            · RCM: Deep-Lying Playmaker (Defend)

            Why? Having one CM stay back provides a safety net when your fullbacks push forward or when your attack loses possession during the Counter style.

            Attackers

            · LM: Inside Forward (Balanced)

            · RM: Inside Forward (Balanced)

            · Note: While many players (including myself) prefer Playmakers for control, WZO uses Shadow Striker at CAM to create a two-striker threat.

            · CAM: Shadow Striker

            Why Shadow Striker? In a Counter system, you want players running in behind, not dropping short for the ball. The Shadow Striker acts as a second striker, making it incredibly difficult for the opposition’s defensive line to mark.

            · ST: Advanced Forward

            Tactical Settings

            · Defensive Style: 80 Depth (Adjustable)

            · Pro Note: WZO uses 60-70 depth against pro players, but for the vast majority of FC 26 players, 80 Depth is the optimal setting to suffocate opponents and win the ball back high up the pitch.

            · Build-Up Play: Counter

            · The Philosophy: Stop looking for short, safe passes. The goal is to get the ball forward immediately.

            How to play: Use R1 (RB) Triangle passes (driven through balls) to break lines. If you have space in front of you, use the Rapid Glitch (sprint boost) to exploit it. This is a front-footed, direct style. If you struggle with manual run triggers, this system is even more effective because the Shadow Striker and Advanced Forward will naturally make aggressive runs for you.

            Part 2: In-Game Micro-Adjustments

            Using the same tactic for 90 minutes is the biggest mistake you can make. To go from 11 wins to 13 wins, you must read the game and adapt. Here are the key adjustments you can make depending on the situation:

            SituationAdjustmentReasoning
            Protecting a lead (last 15 mins)Change RCM and LCM to Deep-Lying Playmaker (Defend).This solidifies the midfield, making it nearly impossible for opponents to pass through the center.
            CAM is invisible / marked outChange CAM from Shadow Striker to Playmaker.This drops the CAM deeper to pick up the ball between the lines, creating space and giving you a passing outlet.
            Wingers are isolated / PressedChange one Inside Forward to Winger and the other to Inside Forward (Attack).This creates variety. The Winger stays wide to beat the press, while the other makes a direct run into the box.
            Striker keeps getting offsideChange ST from Advanced Forward to False 9.This drops the striker deep, dragging the center-backs out of position. It allows your Shadow Striker (CAM) to run into the vacated space as the main goal threat.

            Part 3: The Secondary Formation (4-5-1)

            You need a secondary tactic ready. Switch to this formation if your opponent is a defensive master who manually controls their CDM or CAM to cut your passing lanes in the 4-4-1-1.

            The Setup

            · Fullbacks: Fullback (Balanced) — Both sides.

            · Central Midfield (The Trio):

            1. LCM: Playmaker

            2. CM: Deep-Lying Playmaker (Defend)

            3. RCM: Box-to-Box (Ball Winning)

            · Wide Midfielders:

            1. LM: Inside Forward (Balanced)

            2. RM: Inside Forward (Balanced)

            · Striker:

            ST: Advanced Forward or False 9 (depending on if you need runs in behind or build-up).

            · Tactics:

            1. Build-Up: Counter

            2. Defense: 80 Depth

            Why use the 4-5-1?

            The 4-5-1 dominates the midfield. By using a Playmaker and a Box-to-Box alongside a defensive anchor, you overload the center of the pitch. This is crucial against opponents who are skilled at manually cutting the passing lanes to your CAM. If you can’t find your number 10 in the 4-4-1-1, switch to this shape to regain control of the midfield battle.

            Summary of Key Principles

            1. Be Direct: Use Counter style. Do not recycle possession unnecessarily. Use R1 + Triangle and rapid dribbling to attack space immediately. To build a squad capable of executing this direct style without delay, you can buy FIFA 26 Coins from MMOEXP, a trusted platform that helps you acquire top players quickly and safely.

            2. Use the Shadow Striker: Don’t be afraid to use a CAM with good attacking positioning. They function as a second striker in this system.

            3. Protect Your Defense: Use one Deep-Lying Playmaker (Defend) in the 4-4-1-1 to avoid being exposed on the counter-attack.

            4. Adapt or Die: Do not play the entire game with one tactic. Use the micro-adjustments chart based on what your opponent is doing.

            5. Have a Plan B: If your 4-4-1-1 isn’t working because the opponent is suffocating your CAM, switch to the 4-5-1 to gain numerical superiority in midfield.

            6. Try these tactics out in Champions. Pay attention to how your players move on the Counter style, and don’t be afraid to make those in-game adjustments. For reliable coins to strengthen your squad and fully utilize these strategies, visit MMOEXP to buy FIFA 26 Coins with ease. Good luck.

            Best Ways to Farm Rusted Bolts in Arc Raiders

            Best Ways to Farm Rusted Bolts in Arc Raiders

            Success in Arc Raiders isn’t just about winning gunfights—it’s about understanding which materials quietly power your progression. Knowing what to loot, where to find it, and how to extract safely can make every run count. Among the most reliable crafting resources you’ll encounter are Rusted Bolts, an unassuming item with surprisingly high value.

            At first glance, Rusted Bolts might look like scrap, but they’re anything but junk. Each stack can be broken down into 8 Metal Parts or sold for 640 Coins, making them an excellent mid-game material whether you’re focused on crafting upgrades or building a steady income. Because they’re tied to Mechanical and Industrial loot tables, they’re also far more predictable to farm than many rare materials.

            The real strength of Rusted Bolts lies in their flexibility. Metal Parts are a core ingredient in a wide range of crafting recipes, including weapons, armor components, and utility modules. Recycling Rusted Bolts is often faster and more reliable than hunting Metal Parts directly, especially during early and mid-game progression.

            From an economy standpoint, Rusted Bolts are equally valuable. Selling them provides consistent coin income with minimal risk. If you’re saving up for loadout upgrades or planning to purchase ARC Raiders Items later to speed up your progress, extracting with Rusted Bolts is one of the safest ways to grow your currency without gambling on rare drops.Upgrade your arsenal instantly—choose MMOexp for reliable ARC Raiders Items and unstoppable gameplay.

            Your gear setup matters more than many players realize when farming materials. A standard loadout paired with Looting Mk 2 or Looting Mk 3 is strongly recommended. These backpacks include safe pockets, which are critical for protecting your loot.

            Safe pockets ensure that Rusted Bolts remain yours even if you’re eliminated during a run. Since bolts commonly spawn in stacks, losing just a couple during PvP can erase most of your profit. While the free loadout may look tempting, it lacks safe pockets entirely, making it a poor choice for resource-focused runs.

            If your priority is efficiency rather than combat, favor survivability, stealth, and extraction routes over raw firepower.

            Rusted Bolts appear in Mechanical and Industrial zones, giving you plenty of flexibility across maps. Nearly every location in Arc Raiders—except Buried City—offers opportunities to find them.

            That said, certain areas are noticeably better due to higher container density and loot quality:

            Industrial complexes

            Mechanical control rooms

            Assembly lines and processing plants

            Utility corridors and maintenance sections

            These zones frequently spawn the lockers, drawers, and tool chests associated with Rusted Bolts.

            Containers You Should Always Check

            Targeting the right containers is just as important as choosing the right location.

            Red Lockers

            These are one of the most reliable sources of Rusted Bolts. Red lockers often appear in clusters, and each one can roll industrial materials. Finding multiple lockers in a single room greatly increases your chances of pulling several stacks in one stop.

            Tool Chests

            Usually yellow or white, tool chests often contain multiple searchable compartments. They’re common in workshops, factories, and maintenance rooms and have a strong chance of yielding Rusted Bolts.

            Shipping Containers with Side Drawers

            Some shipping containers include external drawers that are easy to miss. Because these containers are typically placed in industrial zones, they’re excellent bonus loot if you’re already passing through the area.

            High-Value Map Locations

            If you spawn on Dam Battleground, head straight to the Water Treatment Control. This location frequently contains multiple red lockers grouped together, making it possible to collect several stacks of Rusted Bolts in minutes.

            On Stella Montis, the Assembly Workshop stands out as another prime farming spot. Tool chests are plentiful, and many rooms are packed with mechanical containers. It’s also less contested than major PvP hotspots, making it ideal for safer farming runs.

            Optimal Rusted Bolts Farming Route

            For maximum efficiency, follow a route that balances loot density and extraction safety:

            1.Hydroponic Dome Complex

            Start by checking tool chests, maintenance drawers, and metal shelving.

            2.Water Treatment Control

            Move here next to loot red lockers and industrial containers—this area has some of the highest Rusted Bolts density.

            3.Primary Facility

            Finish by checking shipping containers and side drawers throughout the facility.

            4.Extract via the Nearest Elevator

            Once your safe pockets are full or your backpack is heavy, extract immediately to secure your haul.

            This route minimizes unnecessary travel while keeping you close to reliable extraction points.

            With the right loadout and a consistent route, Rusted Bolts become one of the easiest and safest materials to farm in Arc Raiders. Whether you’re crafting upgrades, stacking coins, or preparing to buy ARC Raiders BluePrints for faster progression, mastering this resource will give you a clear advantage on every run.

            How to Finish the Love is Dead Quest in Path of Exile 3.27

            How to Finish the Love is Dead Quest in Path of Exile 3.27

            The Love is Dead quest in Path of Exile is one of the most emotionally charged moments in the game sprawling storyline.While it’s not a mechanically complex quest, it provides important lore connections, solid experience gains, and a Book of Skill reward-making it worth completing even for seasoned players replaying the campaign.Enhance your gaming experience with instant POE currency purchased through MMOexp!

            How to Start the Love is Dead Quest

            1.Once you reach Act 8, head to The Sarn Encampment-your main town hub for this chapter.There, speak to Clarissa, who will give you the quest.

            2.Clarissa believes the Ankh, when used in an Azmerian resurrection ritual, can restore Tolman’s soul to his body.

            3.She pleads with you to retrieve the Ankh from The Quay, a dangerous and corrupted area filled with undead enemies.Agree to help her, and your journey begins.

            Quest Summary

            Act:8

            Starting NPC:Clarissa

            Quest Locations:The Sarn Encampment-The Quay-Resurrection Site-The Sarn Encampment

            Objectives:Retrieve the Ankh of Eternity and assist Clarissa in the resurrection ritual.

            Final Boss:Tolman (resurrected as a zombie)

            Reward:Book of Skill (1 Passive Skill Point and 2 Respec Points)

            Step 1:Retrieve the Ankh of Eternity

            Travel to The Quay, accessible from the eastern exit of The Sarn Encampment.The area is a maze of decaying docks and flooded pathways filled with undead, corrupted mariners, and imperial spirits.

            Tips:It’s one of the more dangerous early Act 8 zones, so be prepared with crowd-control skills or defensive flasks.Equipping strong gear early-especially life and resistance-focused Path of Exile Items-can make this part much easier.

            You’re looking for the Ankh of Eternity, which is always found deep within The Quay.It rests inside a shrine guarded by several packs of enemies, and sometimes mini-bosses or rare monsters can spawn nearby.

            Once you pick up the Ankh of Eternity, your quest log will update, instructing you to bring it to Clarissa, who’s waiting in a nearby offshoot area called the Resurrection Site.

            Step 2:Give the Ankh to Clarissa

            After retrieving the Ankh, continue deeper into the Quay to locate Clarissa.Speak to her, and she’ll take the Ankh and immediately begin chanting the resurrection spell.

            As Clarissa channels her energy into the ritual, it becomes clear that something is going horribly wrong.Instead of reviving Tolman as he was, the dark magic within the Ankh twists his body and soul, turning him into a corrupted zombie.

            The ritual collapses, and waves of undead begin pouring into the arena.You must now fight for your life as Clarissa watches in horror.

            Step 3:Defeat Zombie Tolman and the Undead

            This battle unfolds in two phases.

            First, you’ll face multiple waves of lesser undead-these are weak but numerous.

            Tips:Keep moving, avoid being surrounded, and use AoE attacks or movement skills like Flame Dash, Whirling Blades, or Leap Slam to control space.

            If your build feels underpowered here, consider improving your defenses or damage output by buy Path of exile currency and trading for better Path of Exile Items on the market.Even small upgrades-like adding more resistances or chaos mitigation-make this fight significantly smoother.

            Tips for surviving the Tolman fight:

            Maintain distance.Tolman melee attacks can chunk large portions of your health bar.

            Avoid standing still.Keep circling the arena to prevent getting boxed in by adds.

            Focus on Tolman last.Clear minions first to create breathing room, then concentrate your damage on Tolman.

            Use resistant flasks.While mostly physical, some of his zombie adds deal chaos or elemental damage.

            Once Tolman falls, the arena quiets.Clarissa will kneel beside his lifeless form, overcome with grief.

            Step 4:Speak with Clarissa

            After the battle, talk to Clarissa to continue the quest.

            Clarissa vows to destroy the Ankh of Eternity forever so no one else suffers the same fate.She promises to return to The Sarn Encampment and thanks you for your help, though her gratitude is laced with sorrow.

            Step 5:Return to The Sarn Encampment

            Return to The Sarn Encampment and find Clarissa once more.She will thank you for helping her put Tolman to rest and reward you with:

            Book of Skill-Grants 1 Passive Skill Point and 2 Passive Respec Points.

            Experience for completing the quest.

            Why Love is Dead Matters

            1.It adds weight to Clarissa story arc-showing her transformation from hopeful survivor to someone broken by the cruelty of Wraeclast.

            2.Beyond the lore, the Book of Skill reward is invaluable for any build, giving you a permanent passive point-something that makes the quest essential for every playthrough.

            If you’re rerunning Path of Exile for the new league or simply experiencing the campaign again, don’t skip Love is Dead-it’s a haunting reminder that even in the pursuit of power, love and loss still define the human heart.